Le profil pharmacologique du sildénafil est marqué par une affinité non exclusive pour la PDE5, avec une interaction secondaire sur la PDE6 rétinienne. Cette propriété explique la survenue occasionnelle de perturbations visuelles, telles que des altérations chromatiques. Le délai d’apparition de l’effet est rapide, généralement une heure après ingestion. Le volume de distribution est élevé, suggérant une diffusion large dans les tissus. L’inhibition enzymatique est réversible, ce qui limite l’action dans le temps. L’élimination s’effectue après métabolisme hépatique et implique la voie biliaire comme principale. Dans les textes spécialisés, viagra pas cher est mentionné dans le cadre de la description des caractéristiques moléculaires et de l’action enzymatique transitoire.
Lba10-a123-manual-eng.doc (.pdf
HYPERION Lithium Balance Adapter - For Lithium Polymer and A123 Warnings: Batteries can be a fire hazard if charged or discharged improperly. Always use your battery charger and batteries as directed by the makers. Never Charge Batteries unattended Charge in an area free of flammable materials, on non-flammable brick, concrete, etc Keep Batteries, Charger, and Balancer AWAY FROM CHILDREN and PETS! Never attempt to charge an impact- damaged (crashed) battery pack Packs which are chronically far out of balance may be damaged and should be discarded
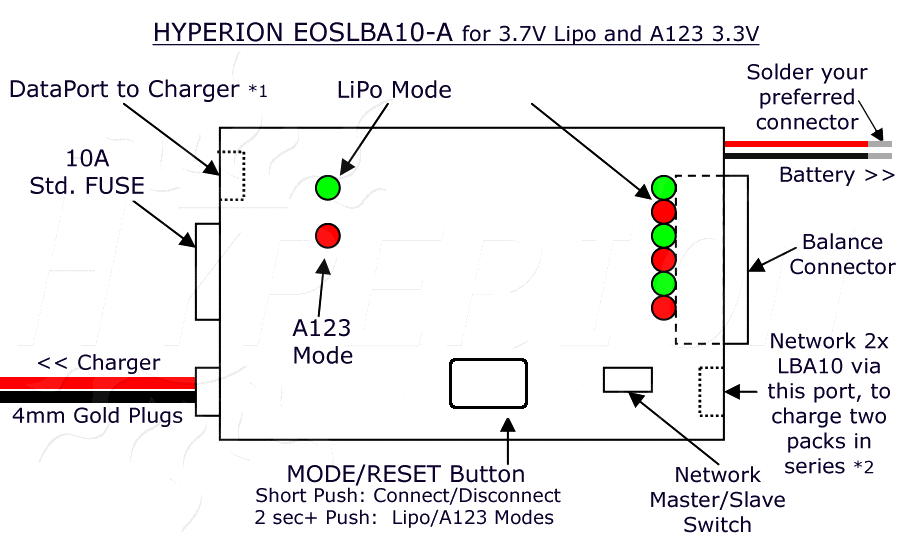
1: Option Cable #HP-EOSLBA10-DPC required and charger must have DataPort option
2: Option Set #HP-EOSLBA10-MSC required for Networking LBA10
The Hyperion Lithium Balance Adapter (LBA10-A) is an extremely versatile device. It can balance either lithium 3.7V or A123 3.3V packs - with“balance connector” correctly attached to the pack - in voltage range of 2S~6S three ways:
Stand-Alone* discharge method (without using a charger or discharge device)
Loaded discharge method (using any load device for discharge load)
Balance while Charging (using a LiPo or A123 compatible charger)
*Standalone is called “Disconnection” mode, because the path to charger/discharger is disconnected
To use the LBA10, a Balance-Connector must be wired to your battery pack. The LBA 10 comes with 2S and 3S harnesses which fit Hyperion, Polyquest, Poly-Q, E-Tec and some other brand lithium packs. 4S to 6S harnesses are available separately. (Hyperion A123 packs use 7-pin “6S” connector for all packs, 2S~6S). Hyperion also offers JST EH and JST XH type harnesses, which fit many other liPoly pack brands. If your pack does not have such a connector, and you are confident in your ability to install one, you may purchase the connector Part #HP-EOSLBA-MC-P4 (2S~4S packs), #HP-EOSLBA-MC-P5 (5S packs), or #HP-EOSLBA-MC-P6 (6S LiPo, all Hyperion A123 packs), and attach it according to the diagrams at the end of this manual.
Note: Packs with Hyperion-style “6S” balance connectors wired correctly can connect directly to LBA 10 without intermediate harness. USE OF THE LBA10 Note: LBA10 usage is identical for both Lithium Polymer and A123 lithium cell types. By default, the LBA10 is in “LiPo” mode when the battery is connected. To enter “A123” mode, push the MODE/RESET button for 2 seconds, until you see the Red A123 Mode LED light up. When LBA10-A is connected via DataPort Cable to Hyperion Charger in A123 Mode, the Charger will give DATA RANGE OVER error if the LIPO/A123 Mode settings do not match between Charger and LBA10-A. See technical differences and cautions later in this document.
Prepare your LBA by soldering a mating Main Connector for your battery pack to the red/black PACK CHG (LBA OUTPUT) wires
Let’s attach your lithium pack to the LBA in Disconnection Mode to see how the LED indicators work…
Be sure the NETWORK switch is set to MASTER
Select the appropriate harness for 2S~6S. Connect harness to LBA at port marked ‘Balance Harness’
Connect your Lithium pack to the LBA Multi-Connector
The LiPo 3.7V MODE LED will blink at one-second intervals(if A123 pack, hold down Mode/reset button 2 seconds now to switch to A123 3.3V mode)
WITHIN 12 SECONDS, Connect your Lithium Battery Connector to the connector you installed on the LBA OUTPUT wires
MODE LED will be ON continuously in Disconnection Mode … OR will show an ERROR: If you have errors, check to see that you have the proper harness installed and battery in good conditionIf your pack is already very closely balanced, the LBA 10 will automatically shut down and turn off all LED. There is no work for the LBA to do! After shutdown the LBA puts an extremely small drain on the battery. However, you should always disconnect the battery from LBA as soon as possible after balancing is complete, especially for the smallest packs. If your pack needs balancing, the LBA will go to work, discharging the cells with highest voltage. Each CELL LED will have one of these three states: ON SOLID:
QUICKLY FLASHING: Discharging that cell at low/medium rateOFF:
That cell’s voltage is low, so no discharging
*LED COLOR: Cells 1-3-5 are always RED; 2-4-6 always GREEN.The colors just help you identify which cell is which.
If you leave the Lithium pack attached to the LBA now, it will continue discharging the high-voltage cells until the pack is very closely balanced. When balancing is complete, the CELL Condition LEDs will each Flash, then all LEDs will go dark and the LBA will power OFF. At this point the drawon the Lithium pack is very small (490uA), so you could leave the pack connected for extended periods without damage. HOWEVER, lithium packsshould always be disconnected from the LBA as soon as possible after completion. Charging should NEVER be left unattended!!
NOTE: When a lithium pack is first connected to the LBA, you start in “Disconnection” mode. When the LBA is not connected to a charger, the two 4mm gold connectors on the LBA are not insulated. In disconnection mode, these may freely touch each other without harm. However, if they touch while in “Connection” mode, the LBA fuse will blow. To avoid this, use the connector covers included with your LBA10 to insulate the connectors, whenever not connected to a charger! ____________________________________Continued reverse page NOTE: The LBA contains Auto-Cut circuitry to avoid over-discharging a badly out-of-balance pack, or a pack which starts with voltage too low already. If any one cell ever falls below the protection limit, the LBA microprocessor powers OFF, regardless of balance state, and discharging is stopped. Charging with a single LBA 10 in “Connection Mode”, using a Compatible Charger, for 2S to 6S
First, set your charger cell count and charge rate appropriately for your battery pack. For example, if you have a 11.1V LiPo 1200mAh pack, set the charger for “lipo mode”, 3S (11.1V) and 1.2A (“1C” for 1200mA pack). The LBA can be used at charge rates up to 10.0 amps. Note: All Hyperion Lithium Polymer support 2C max charge rates (2.4A for a 1200mAh pack) but other brands may be limited to “1C”. Consult documentation before exceeding 1C rate with LiPoly. ( see A123 notes, last page) CONNECTION SEQUENCE (after step 5, push MODE/RESET 2 seconds if A123 Battery) 1) Check to be sure that the LBA Network Switch is in MASTER mode 2) Connect the LBA 10 INPUT LEADS to the Charger, via the two male 4mm gold plugs 3) Connect the appropriate 2S-6S balance harness to the LBA 10 4) Connect the Balance Harness to your Lithium pack 5) Quickly (within 12 seconds) connect your pack Main Wires to the Red/Black LBA OUTPUT wires
At this point, the sequence is the same as before: We start in “Disconnection Mode. You should see a solid STATUS LED, and at least one blinkingCELL LED. If so, push the MODE/RESET Switch on the LBA to enter CONNECTION MODE.
After a brief pause, the STATUS LED should start single flashes to indicate that connection mode is active. Check to be sure the STATUS LED isblinking in one-second intervals before continuing.
Now push the “START” button on your charger. There’s nothing else to do, until your charger indicates the charge has completed. At that time,press the MODE button to enter DISCONNECT MODE, then detach components in this order:1) Disconnect your lithium pack Main Connector from the LBA Output Wires2) Disconnect the Balance Harness from your Lithium pack3) If desired, disconnect LBA 10 from the charger
NOTE: if you start with a very closely balanced pack,the LBA may power off shortly after the battery is connected. In that case, push the MODE button TWICE to enter connection mode for charging. NOTE: Chargers which do not have a start button will begin charging when you start Connect Mode by pushing the MODE button (or pushing MODE twice if the LBA has already shut down with well balanced pack) NOTE:If you have connected your LBA 10 to a DataPort equipped charger (EOS5i DP, EOS 1210i.), via the optional DataPort Cable, you need not press the MODE button to disconnect when charge/balancing is finished. The charger automatically tells the LBA to disconnect… The DataPort cable and supporting charger allow you to monitor the voltage of each cell during the charge process, via the charger’s LCD screen. If Charger and LBA Battery Type Setting (LiPo vs A123) do not match, the charger will error: DATA RANGE OVER ERROR Using a single LBA 10 in “Connection Mode” with Discharge Load
If you want to speed the discharge balance process (compared to Disconnection Mode), you can attach an appropriate load to the LBA Power INPUT4mm Gold Connectors. While this could be a simple as a 12V light bulb, you do need to be sure that the current drawn is appropriate for your pack,and does not exceed the LBA’s 10A limit. Any charger which has Discharge capability can be used, even if it does not have an Auto-Cut function,because the LBA will properly limit discharging of the pack, assuming all cells are above minimum voltage to start.
Procedure is the same as with Connection Mode Charging. Make the appropriate settings on your discharger, and select the appropriate LBAHarness to match your pack. Connect the Discharger (or light bulb, or other load you have chosen), via the LBA’s two male 4mm gold bananaplugs.
We start in Disconnection Mode by connecting the lithium pack to the LBA’s multi-connector harness, and then quickly attaching the Main PackWires to the LBA Output Wire set. Push the MODE/RESET Switch on the LBA to enter Connection Mode. After a brief pause, the Status LED shouldstart single flashes to indicate that connection mode is active.
Now push the “START” button on your discharger. When the LBA completes balancing, or shuts down because one cell is getting too low, the circuitwill be disconnected. Many Dischargers (such as the EOS series) will sound an alarm when the circuit is opened. If using a Light Bulb, the bulb willlight when you push the MODE/RESET Switch to enter connection mode, and bulb will go off when the LBA completes balancing and shuts down. Using Two LBA 10, Networked to Balance two similar packs as a single unit NETWORK CHARGING NOTES:
* A lithium charger rated to suit the total SERIES (S) cell count of thetwo packs is required. That is, to charge a 4S and a 4S pack as 8S, you
* The two packs must be from the same maker, of same capacity and
need a charger rated for 8S or higher.
type (ex: VX3700-3S, VX3700-4S to make 7S)
* As an alternative to a single high-S charger connected as below, you
* Ideally, the two packs should have similar history. That is, they are
could use two chargers each connected separately to LBA10 and pack.
both new, or they have both been used in the same model, separately,
After each pack is balance-charged separately, check cell voltages of
for about the same number of flight hours before. You simply want to
each pack. If within 0.05V/cell, connect and fly. If not, connect the two
avoid pairing tired or old packs with fresh, new packs.
packs as in the Master/Slave example below, and balance them viaDI SCONNECT Mode as a unit. Only the high cells are reduced involtage, and effect on capacity is negligible…
Two-Pack System Advantages
* 5S packs flown in 2.5Kg model can becombined to 10S to fly a new 5Kg model,for example.
*Damage to one pack means replacingonly _ the battery system.
*Two packs can easily be rearranged tofit in a model, to provide proper CGwithout adding weight
*Versatile: change from Series to Parallelconnections effortlessly
The LBA 10 Net Balancer can be connected as in the preceding diagram, in order to balance charge two similar packs such that the voltage of allcells in both packs are balanced within 0.05V of each other, or better. This allows you, after balance charging is complete, to safely connect the twopacks in series and fly them as a single unit in your model. CONNECTION SEQUENCE
Set one LBA10 to SLAVE mode on Network Switch, one on MASTER mode
Connect the 4mm Female-Female Series Adapter from option pack #HP-EOSLBA10-MSC, as shown above by the blue line between Positive/Negative Input Cables of the two LBA units. Connect the NETWORK CABLE, as shown by the Orange line, between the two LBA10 units.
Connect the two remaining Red/Black LBA 10 INPUT LEADS to the Charger, via the two male 4mm gold plugs
Connect the appropriate 2S-6S balance harness to each LBA 10
Connect the appropriate pack to the balance harness on SLAVE LBA first!
Connect the appropriate pack to the balance harness on MASTER LBA
Quickly (within 12 seconds) connect the Main Leads of each lithium pack to the Red/Black LBA OUTPUT wires
Press the MODE button to enter CONNECTION mode (or leave ‘as is’ to DISCONNECT balance without charging)
Start your charger (unless you are disconnect balancing!)
If you have trouble, it is most like that the first Slave LBA has timed out before you got all the connections made. Arranging the variouscomponents carefully on the table beforehand is very helpful. After a little practice, it’ll be easy.
Disconnection after charging is finished by reversing the sequence above.
---- Connecting Packs in Series before Flight, Disconnecting before Charging or ‘Disconnect Mode Balancing’ ----
NOTE: When wiring two packs in series for flight, we suggest using Gold Bullet Connectors of the appropriate current rating. Hyperion offers 3.5mm short gold connectors for battery <> ESC connections up to 25A continuous (40A peak /10 seconds), 4mm long connectors for 20~60A continuous (80A peak/10 seconds), and 6mm short connectors for 40A~80A continuous, (110A peak /10 seconds). It is always well to keep the wires between Battery and Speed Controller (ESC) as short as possible [they should never be made longer than as supplied by maker - if necessary, add length to wires between Motor and ESC instead]. For packs which will always be paired in Series in your model, we recommend that you cut short the RED wire on one pack and the BLACK wire on the OTHER pack - just long enough that the two wires can be joined by a single Male/Female pair of Bullet Connectors. The remaining longer RED wire should have a MALE connector attached*, and the remaining longer BLACK wire a FEMALE connector. These two will connect to your ESC. In this way, you not only reduce the total length of battery<>ESC circuit, you also make it very clear which two leads get connected for Series (the short ones). BE SURE YOU NEVER SHORT THE TWO BATTERIES BY CONNECTING THEM DIRECTLY TOGETHER! (it may sound silly, but can happen if you aren’t paying attention!)
When Charge, Discharge, or Disconnect Balancing each of these packs, the main RED/BLACK wires must all be disconnected. Then each LBA’sOutput Wires connected directly to each battery pack’s main Red/Black wires.
*Male Connector on battery (+) is industry standard. Batteries do not have Ground (Earth), so it doesn’t matter if the (+) connector has exposedmetal (as long as ONE of the two connectors is shielded, you’re ok). Your charger does have ground, however. Therefore you want the FEMALEconnector on charger side (+) Output, because it is covered completely with shrink tubing. As such, it cannot short on the grounded (-) metal caseof the charger. TECHNICAL ADDENDUM EOS LBA 10 – HARNESS WIRING FOR HYPERION (and compatible) LITH IUM-POLYMER 3.7V nominal PACKS (2S and 3S harnesses are included with LBA10. 4S, 5S, 6S available as accessory items) EOS LBA 10 – HARNESS WIRING FOR HYPERION A123 PACKS
Hyperion A123 packs use the ‘lipoly’ 6S-type battery-side connector for all packs 2S~6S. The A123 PACK Connector plugs directly into LBA10without additional harnesses between A123 pack and LBA10. If you are building your own large-capacity lithium polymer packs from loose cells, oryour own packs using A123 cells, we suggest this method below as best practice. (use #HP-EOSLBA-MC-P6 connector to wire packs)
Note:_Current A123 2300mAh cells have a protruding button which is NEGATIVE polarity. Whenever assembling any pack, be sure of the polarity before beginning wiring. Future A123 cells could differ from the diagram supplied above, in this respect. Note:_Current A123 2300mAh Cells may be safely fast charged at rates up to 10A per cell (or roughly 4C), for charge times in the range of 10 to 15 minutes. Consult documentation for your pack to be sure about max recommended charge rates. EOSLBA10-A General Specifications Protection Voltages (± 0.01V) Input Voltage (charger) Over Charge Supported Output 3.7V LiPo Over Discharge Battery Types Power Down V Battery Volt Range Short Protect Max Charge Current Over Charge Voltage Resolution Over Discharge Power Down V Short Protect
For additional technical support, please first contact the Hyperion dealer from whom you purchased the LBA10.
*Note: The LBA10 has been specifically designed to be compatible with the majority of chargers on the market, and tolerant of high transient voltages. However, some chargers on the market may output extremely high transient voltages when they encounter an open circuit, which could potentially damage any Balancer or PCM device, regardless of safeguards employed. Therefore, it is “best practice” to use Hyperion chargers, as they are expressly designed to limit voltage under open-circuit conditions, and are guaranteed safe with any PCM or Balancer device. Warranty Hyperion LBA10 are fully guaranteed against defects in material or workmanship for 12 months from date of purchase. The warranty does NOT cover damage to reverse-polarity connection, over-spec use, water or impact damage, nor any other claim not arising from a defect in materials or assembly. You must contact your selling dealer with details of the problem before making a return. In most cases, the problem is an issue with setup, and can easily be resolved at no expense to you. Items returned without notice in which defects are not found can only be returned to the sender at his expense. We sincerely hope you enjoy this Hyperion Product!
PENNSYLVANIA MUNICIPAL ELECTRIC ASSOCIATION WEDNESDAY, SEPTEMBER 11 Noon-5:00 PMEA Golf Outing Room Check-in Welcoming Hospitality Reception/Associate Member Exhibits THURSDAY, SEPTEMBER 12 7:00-8:00 a.m. Continental Breakfast and Registration Foyer outside of the Assembly Room Welcoming Address Vance Oakes, Grove City Borough Manager/Pr
Buenos Aires, Jueves 25 de Junio de 2009 Nº 1724 La Constitución y los actos eleccionarios. Escribe el Dr. Rodolfo Aníbal González Pensamientos y coincidencias. En 1831 Alexis de Tocqueville (1) viaja a los Estados Unidos de América, enviado por el gobierno galo, a ver «a qué se parece una granRepública» . Este joven de veinticinco años desembarca en Newport, c
 HYPERION Lithium Balance Adapter - For Lithium Polymer and A123
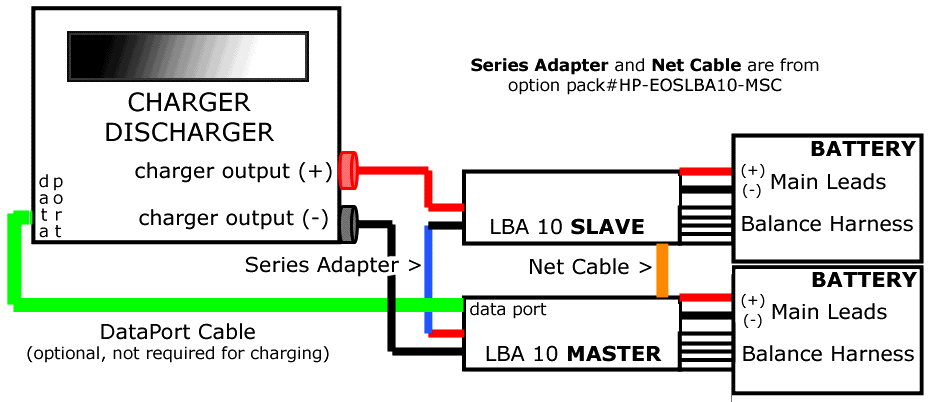 Charging with a single LBA 10 in “Connection Mode”, using a Compatible Charger, for 2S to 6S
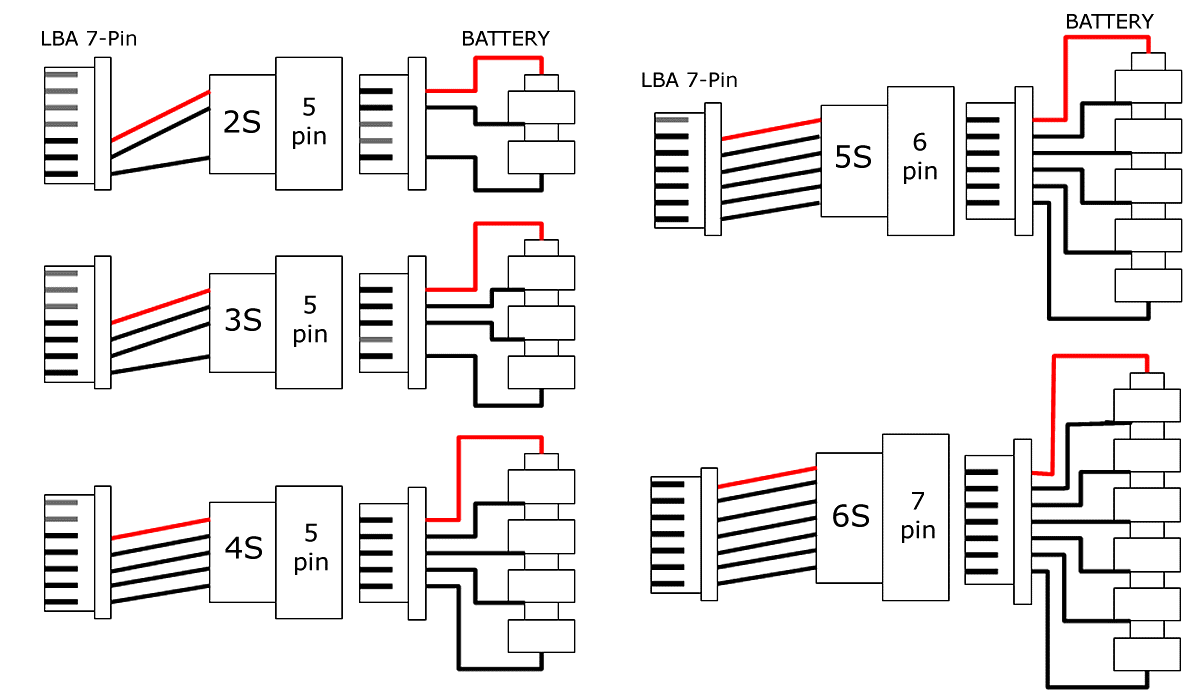 The LBA 10 Net Balancer can be connected as in the preceding diagram, in order to balance charge two similar packs such that the voltage of allcells in both packs are balanced within 0.05V of each other, or better. This allows you, after balance charging is complete, to safely connect the twopacks in series and fly them as a single unit in your model.
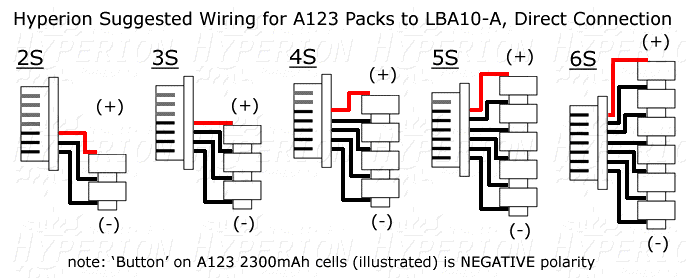 EOS LBA 10 – HARNESS WIRING FOR HYPERION A123 PACKS